Search This Blog

Thursday, 19 July 2018

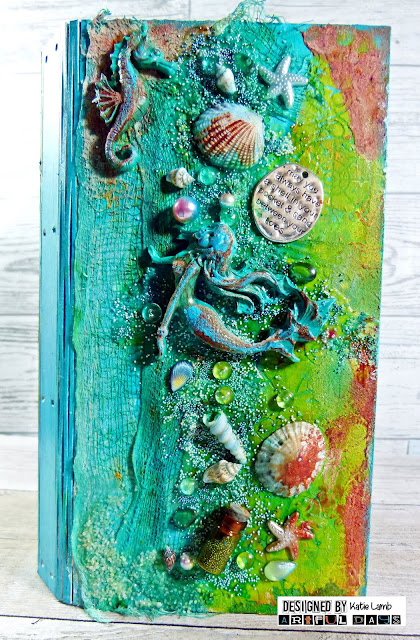
"Lets Sea that Journal" - by Katie Lamb


Evening crafter's.

Here's our last Sea themed project, Katie has taken one of Sam K's MDF Journal covers and created this fabulous layout. Using my favourite resin piece, the sea horse, and it's been transformed by beautiful rich colours and textures. 

I really hope that you have enjoyed our projects by the design team, and are inspired to create something memorable this summer.

A few people asked me if they was a way to easily view all these products on our website, and so I have created a new category in the Treasure Trove section called "Seaside" here you will find all the ocean delights the DT have been playing with :)


Paint the MDF book cover white and let it dry. Cover then with turquoise paint and let it dry before applying a stencil mask. 

I use modelling paste and only used part of the stencil to give it a distressed look. 


Dye some cheese cloth with blue and green ink and dry it off with a heat gun.  


Glue it down the book and then apply heavy gel medium to the cover. Sprinkle on microbeads,drew drops and mermaid beads.


Take the resin pieces and paint them turquoise, Next apply texture paste over them and once this has set, paint with quinacridone gold fluid acrylic. 


Paint part of the book cover with yellow-green acrylic paint and apply more texture paste around the edges. Add more quinacridone gold over the top to create a rusty look. 


On the back of the book I covered with a stencil mask and sprinkled over Cathedral Pines Magicals, apply water to spread the colour. 

Then apply yellow-green acrylic paint mixed with a little water. The final layer is texture paste and quinacridone gold acrylic paint.


Product links

If you would like to see more of Katie's projects, please check out her blog https://whatkatiedid2.blogspot.co.uk/

We would love you to support our designers and leave a lovely comment.


Thanks 

Jules xx


Tuesday, 17 July 2018

Footprints by Teresa Morgan


Hello crafty peeps  

Teresa is back tonight with her last Sea themed blog post, and its a beautiful scrapbooking page. This fabulous layout is just perfect for all your summer snaps. How clever are the rolled up papers?


Apply Distress Ink around the edge of the cardstock using a foam applicator and then stamp the text stamp down the sides randomly. 

Cut a strip of red card and tear across the top edge. 

Place across the cream cardstock. Tear some designer paper and layer over the top with the torn edge uppermost.


Cut 2 inch pieces of designer paper and rough up the edges using a paper distresser. 

Roll into small tubes and glue in place adding the 'summer' die cut on top.


Mat the photo onto co-ordinating cardstock. 

Add a die cut tab and rub on word. 

Arrange with the larger ephemera images.


Arrange the smaller pieces of ephemera, adding a metal word charm.


Apply the rub on quote to finish.


Products Used 


From Stash
12x12 Cream Cardstock
Antique Linen Distress Oxide Ink
Red and Blue Cardstock
Paper Distressing Tool
Kaisercraft Rub On Quotes
Glue
3d Foam

Please leave a lovely comment to support our designers and thanks for looking. 

For more projects for Teresa please check out her blog http://thefatcactus.co.uk and You Tube Channel https://www.youtube.com/channel/UChNbVhMz7jX66gevhKgz5Ig/feed 

Jules xx


Sunday, 15 July 2018

"Rock Pool" ATC Coins By Katie


Evening all

Another weekend flashes by, hope you have been having fun whatever you have been up to. 

With ATCOINS, been the next tend in crafting, of course Katie wanted to include them our ocean themed designs. And just how fabulous do they look? 

They take up a small amount of product, so all those goodies go much further.

If you are new to Artist Trading Coins, then they are 2.5inch circles which you can trade with crafty friends or stash them for yourself.  Its easy to make the base from die cutting a circle or maybe we have some MDF ones coming soon?????? (We do haha)


I stamped over the background with a texture stamp using two colours. 

Then I dyed some cheese cloth sea green using ink and let that dry before cutting it up and gluing it to the coins. Jules also has some Hessin on the website which would also work well.


Next I used some of the elements from the Sea themed ephemera and glued them down. 

I used 3d foam pads to layer up the shells.


I then decorated the coins using beads and gems. I also added a bit of faux moss to give it a more rock pool look to it. 


We would love you to support our designers and leave a lovely comment.


Thanks 

Jules xx

Saturday, 14 July 2018

Sea Canvas by Katie Lamb


Hello Crafter's

Slightly later than planned (due to illness, all mended now yay!!) we are carrying on with our sea loving themed projects. 

Katie has been playing digging into the Lindy's Magicals to play with a green and blue theme with a hint of colour, and wow it really stands out. The centre piece starfish are just so pretty. 

This would look amazing in the bathroom, or really any room in the house. 


Start off by painting the canvas with gesso and then use Lindy's Cathedral Pines Magicals over the top.

Use heavy gel medium to stick down the shells, micro beads and star fish, to make sure the stay in place. 


Once dry paint everything in white gesso and leave to set.


Sprinkle over the top with Lindy's Magicals and blue mist spray. Keep going dabbing and reapplying the colour until happy. Apply more gel medium and sprinkle on micro beads and glass stones.

Next add the coloured gems, Mermaid Pearls and resin starfish to finish the project. If you keep these to a minimum they have a real impact. 


If you would like to see more of Katie's projects, please check out her blog https://whatkatiedid2.blogspot.co.uk/

We would love you to support our designers and leave a lovely comment.


Thanks 

Jules xx