Search This Blog

Thursday, 28 March 2019

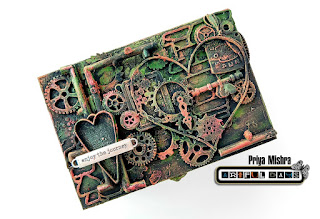
Enjoy the Journey - A Steampunk Box by Priya Mishra


And here's Priya's last blog post.... I love Priya's layering and use of colour in all her projects and tonight's doesn't disappoint. 
With her take on the steanpunk box (you would think this was planned 😁)]

Hello Crafty Friends,

Today I'm here with my last DT post for the term and what a beautiful journey it was...

I thoroughly enjoyed to be here with all my amazingly talented teamies. And Jules is such a sweetheart...

I made a steampunk box using beautiful Scrapiniec Chipboards from the store and loads of other products from the store. 

First I took a MDF box and coated it with a layer of black gesso. 

Then I created some texture using a steampunk style stencil and texture paste.

Once it dried I layered it with Scrapiniec chipboards and some metal steampunk pieces. I covered each layer with black gesso.

Then I coloured it with finnabair metallic paints followed by metallic waxes.

Hope you like it.


Thanks Priya

If you have any questions about this or any project on the blog please do ask, we are more than happy to help.

Please leave a lovely comment to support our designers and thanks for looking.

For more projects for Priya please click on the links below to follow & like her pages.

Blog

Thanks Jules xx


Purple Steampunk box by Katie Lamb


Hello wonderful crafter's 

Tonight is the last round of blogs from our DT, if you have been following them over the last 6 months you will have seen some stunning projects and its so exciting to see my own designs & procured products used within them. 

Tonight its Katie & Priya's turn to take centre stage and show you their projects, both with a steampunk theme.

Huge thanks to Katie for all the designs and shares over her time with me. Its fair to say she's a massive steampunk fan and its been fun to see what creations are coming next. 😁

1st up here's Katie, proving that you don't have to use browns & and blacks when making a steampunk project.

All the products used are at the bottom of the blog.

Its my last project for Artful Days and its been a lot of fun.


I started with a wooden box and painted it with gesso


Glue all the pieces onto the box and paint a few coats of black paint or gesso over the top.


Layer more pieces over the box lid and paint with black paint.

Once dry sprinkle on micro beads 

Next use Lindy's Magicals to add the first layer of colour.

Paint the rest of the box with purple metallic paint.


Thanks Katie :)

If you have any questions about this or any project on the blog please do ask, we are more than happy to help.

If you would like to see more of Katie's projects, please check out her blog https://whatkatiedid2.blogspot.co.uk/

We would love you to support our designers and leave a lovely comment.


Thanks 

Jules xx


Artful Days Shopping list


Wednesday, 27 March 2019

Dream - Altered Diary Cover by Priya Mishra


Hello again

Well tonight is Priya's last solo blog and once again its another inspiring project. Its stunningly simple in many ways, but the crackle gives it sooo much depth and texture, what a fabulous gift for someone special. 

All the products used are listed at the bottom of the email. 


Hello Crafty People


Today I have altered a Diary cover with a lot of AD products and the beautiful chipboards from Scrapiniec which have just been restocked in the web store.

Go and grab them before they are out stock again.....


You always don't need a lot of stuff to make a project. 

You can simply choose a few amazing elements and make some delicate projects like this today.

For this project, I gave a coat of white gesso all over followed by a coat of crackle paste.

 Once the crackle paste is dried, I sprinkled Chimney Smoke sprinkle mist all over.

Then I covered the Scrapiniec chipboard frame and butterfly metal charm with black gesso and glued on the dried cover.

Then I attached the spoon embellishment and the other two metal embellishments on top.

Finally I applied Old silver metallic wax with finger.

I hope you like my project.


Thanks Priya

If you have any questions about this or any project on the blog please do ask, we are more than happy to help.

Please leave a lovely comment to support our designers and thanks for looking.

For more projects for Priya please click on the links below to follow & like her pages.

Blog

Thanks Jules xx


Tuesday, 26 March 2019

Double the Fun from Teresa Morgan & Reniferove


Good evening, so its the last week of blogs and tonight's is a double blog from Teresa & Iwona. 

Please can I thank everyone who have viewed our blogs and left comments, it means so much to the DT. 

We shall be moving away from blogs and more onto social media platforms and more videos, more about that later.......


Teresa is a fantastic teacher and I have loved her step by step processes and explanations.

I want to say a massive thank you to Teresa, its a joy to see whats coming next with each project 


Take a 7x5 inch canvas board and add a couple of strips of torn corrugated card. Gather some MDF cogs, resin embellishments, chipboard frames and a small wooden tray. 

Paint everything with a couple of coats of Transparent Red and Yellow Iron Oxide paint mixed together.


Once dry, arrange the embellishments and glue together using Heavy Gel Medium.


Glue some dewdrops around the edge and in the centre of a cog to simulate rivets.


Add some Pearl Art balls with Heavy Gel Medium for texture and interest.


Apply washes of colour to give a patina effect.


Highlight with white paint and Coral Metallic Lustre


Thanks Teresa 

If you have any questions about this or any project on the blog please do ask, we are more than happy to help.

Please leave a lovely comment to support our designers and thanks for looking.

For more projects for Teresa please check out her blog http://thefatcactus.co.uk and You Tube Channel https://www.youtube.com/channel/UChNbVhMz7jX66gevhKgz5Ig/feed 

Thanks Jules xx

Products used from Artful Days

(from stash)
7x5 canvas board
small wooden tray
DecoArt Media Heavy Gel Medium
DecoArt Media Fluid Acrylics: Transparent Red Iron Oxide, Transparent Yellow Iron Oxide, Blue Green Light, Paynes Grey, Titanium White
DecoArt Americana Neon Lights: Knockout Blue
DecoArt Metallic Lustre: Coral

Even more from Teresa

Have you seen Teresa's Tutorial at Mixed Up Creative Academy yet - all the details here 

To purchase the Kit we have created with Teresa to compliment the workshop - click here 


Steampunk hot air balloon by Reniferove


Good Evening, we have our last blog post from Iwona aka Reniferove. 

I love Iwona's style and compositions of all her projects, its been so exciting to see what's coming next. 

And so a big thank you to you Iwona 😁

My last inspiration for Artful Days is steampunk hot air balloon with patina effect.


I used a lot of gears & cogs, metal embellishments  and mdf shapes from the website and these are all listed below.

To colour I used Lindys Magicals for my background and patina pastes which I made myself, but you can also use the Prima ones.


Thanks Reniferove 

If you have any questions about this or any project on the blog please do ask, we are more than happy to help.

Please leave a lovely comment to support our designers and thanks for looking.

For more projects for Reniferove please click on the links below 

Thanks Jules xx


Artful Days products used