Search This Blog

Thursday 25 August 2016

Mini sea tin by Chris

Hello, well its been a very wet day here, just drying off now and enjoying Chris's post. 


Hi everyone, Chris here again with my second project for the August Goodie box: At The Sea! I had such fun making this little tin collage. I love making mini art and the contents of this month's Goodie box is full to the brim of products that are a dream to work with at this scale! 


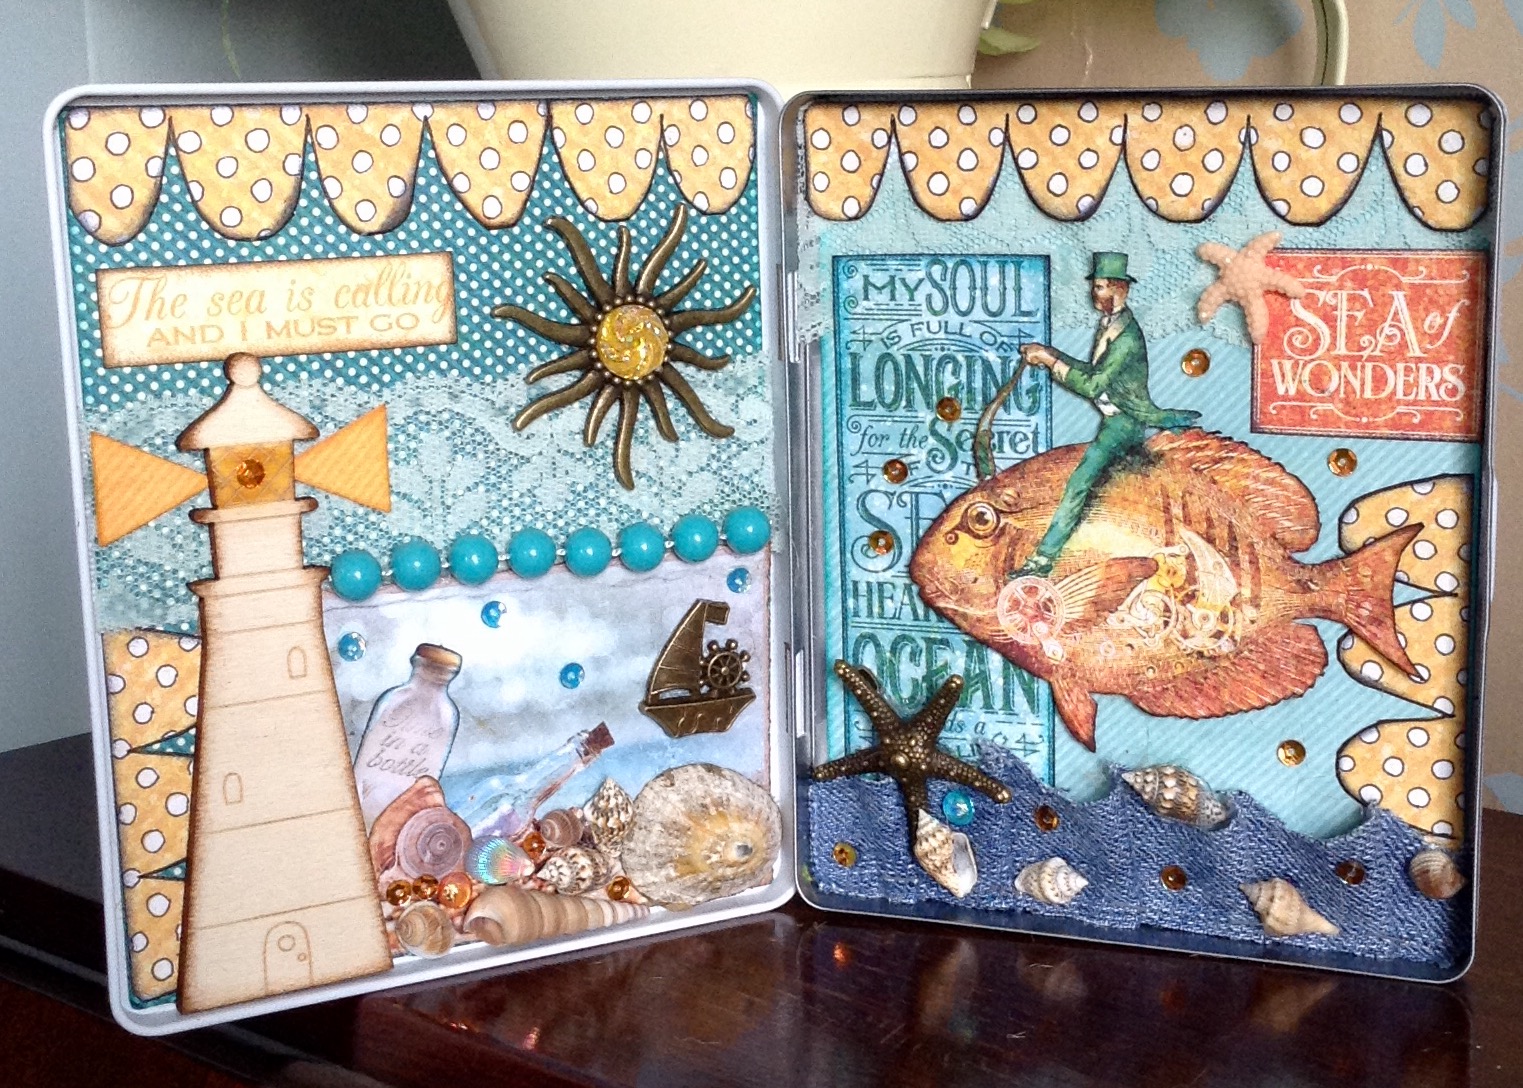
This started life as a Caran D'Ache Neocolours crayon tin. I have lots of these crayons so I've moved them into a jar on my craft table. 


For this project I sorted, cut and assembled all the bits and pieces I wanted to use before committing to anything. This involved 'fussy cutting' into some of the gorgeous Graphic 45 papers (12 generous 6" X 6" sheets) included this month, to create a focal image and accompanying text. There are lots of words and delicious phrases all about the sea on quite a few of the papers. Wonderful. I also created some paper bunting and a wavy 'fringe' to represent the sea with the handy piece of denim in the free pack!! The only item I've added is some pretty vintage lace which I had in my stash. 

Don't you just love that cute lighthouse? I definitely didn't want to paint it but I did need to create some light emanating from it. So where did I start? 


I cut into a couple of the Graphic 45 sheets to fit each side of the tin (these papers are so beautiful) darkening the edges with Archival ink first. I made sure that all the edges of each collage piece was carefully inked before sticking down. It is definitely worth doing albeit time consuming and fiddly! It was then a case of gluing down all the collage items in various layers. 


I do love the little picture cards included this month. I have no idea where Julie finds all of these products but they all complement the theme so well. How great to have everything sorted for you. I love it! Now for further additions...


I cut a strip from the piece of denim, then shaped the top in a wave-like pattern. I made little folds to correlate with the top of each wave and stapled along the bottom to hold each little fold. I was so pleased with the result. A couple of little triangles cut from some of the off-cuts created the illusion of light. Now for the focal image. I do love this: a typical, quirky, Graphic 45 image. Takes a bit of time cutting it out but worth it, I think. 


As you can see, I've added a couple more of the sentiments, a bit of ephemera and coloured in the light on the lighthouse with archival ink in 'Dandelion'. I also inked the edges of the lighthouse before adhering it to the page. Now I just needed to add some shells, gems, sequins and ephemera to bling it all up and complete the 'beach' theme. Great fun.


I do love the string of little blue beads, and the cute sailing ship. I absolutely adore that sun! The photo doesn't do it justice. It has a beautiful Amber gemstone in the middle which catches the light! Too gorgeous to use really! As you can see, you also get a very generous amount of shells in various sizes. I do hope you like my little collage. It is sitting proudly on a bureau in my dining room catching the sun all afternoon! I have a few more step by steps on my blog if you're interested, but I think you get the idea of just what you can make with this month's fabulous selection. 
Until next time, enjoy your crafting!


Wow, this is stunning Chris, I love the light coming from the lighthouse, such inspiration :)


Thanks for visiting and hope you can leave a nice comment. 

Thanks 

Jules xx


Tuesday 23 August 2016

Beach Hut Canvas by Chris

Hello Crafter's 

Chris is on the blog tonight with her Beach Hut canvas.   


Hi everyone, Chris Cresswell (aka artmadnana) here with my first project from this month's gorgeous Goody box: At the Sea! I thought last month's contents were scrumptious but this month's has me salivating! Absolutely loads to play with. Now, as soon as I combed through the delicious items my first project just leapt at me. Once I found the little canvas, I knew I wanted to make a layout of beach huts!


I started by painting the canvas with a blue chalk paint from PaperArtsy. It's an opaque paint so only needed one coat. 


I chose this colour to closely resemble the colour of the tissue paper that Julie wraps the box and items in as I wanted to use this for the background. I cut one of the large sheets Julie includes into four pieces, then scrunched them up tightly before laying them out flat again. Using matte medium I then adhered three of the cut pieces to the canvas, squishing each layer to create various ridges for added texture. 


I then smeared 'Forget-me-not' Archival ink over the surface, catching the ridges, once it had dried. This varied the colours slightly, hoping to create a watery sea-like background. Now to add a beach! This was made by just cutting a strip off one of the yellow/orange Graphic 45 paper sheets included in this month's box, and edged with archival ink in 'Dandelion'. 


I then took some of the burlap/jute from the box to cut and fray a strip long enough to cover the yellow strip of card. I attached this with matte medium. A sticky affair! Beach complete. Now I needed to make a template for my beach huts to ensure they would all be the same size. Why are we all so in love with beach huts??


Now the fun part! Cutting out and gluing beach huts from the gorgeous choice of Graphic 45 papers included this month. You get twelve 6" X 6" sheets to choose from and they are all wonderful. I added little doors and some bunting too. 


Cute aren't they? Julie has included generous lengths of different colour string this time. The turquoise was perfect for the bunting but slightly too thick. So I untangled the strands and just glued the flags onto one strand. Perfect. The colours in the papers are just delicious. Now, all that was needed to complete this summer scene was to choose from the multitude of shells, gems, charms and other ephemera to bring the beach to life. And I still have so much left to make several more items yet! Hope you like it! There are more photos on my blog if you want to pop over! 


Thanks Chris, I love this canvas and the huts are super cute, especially with the little doors.


We have just 8 boxes left, so if you would like one please click here

Thanks for visiting and hope you can leave a nice comment. 

Thanks 

Jules xx


Saturday 20 August 2016

Tag by Linda

Hello Crafter's 

Linda is back tonight with a sea themed tag.


Tag 


First I used Pebeo modelling paste through Tim Holtz sun ray stencil.  Once this was dry I then distressed with DI squeezed lemonade and then peacock feathers.


 I then took one of the ephemera card and attached at an angle onto the tag, I then added the silver sentiment charm and a few of the gems which look like tiny shells.


On the bottom of the tag I layered up some hessian, a strip of denim and added another of the shells.  Using 3 of the flowers arrange them around the shell and inside the shell, snuggling the small glass bottle inbetween.  On the other side I then adhered a couple of buttons, ephemera shells, gems, a large shell and the silver star fish charm.


To finish off I added some of the little sequins, gems and small shells around the tag. I then cut two pieces of the twine in jade and rust threaded the fish charm and threaded through the hole at the top.

Linda's blogs 


Fantastic Tag, loving the stencilling, really sets off the embellishments from the box. 

Thanks for visiting and hope you can leave a nice comment. 

Thanks 

Jules xx


Tuesday 16 August 2016

Easel Card by Linda

Evening all, hope you are all well. 

Linda is up on the blog tonight with a sea themed Easel card using the August Goodie box.


Easel Card


For the base of the card I have matted and layered turquoise pearlescent card and two of the Graphic 45 "Beneath the Sea" papers.  Before adhering to base card I have wrapped turquoise twin and threaded one of the starfish charms, this will add as the stopper for the easel.


For the easel part of the card I have again matted and layered turquoise pearlescent card and another 2 of the papers from Graphic 45 "beneath the sea". You can see that the charm works brilliantly as the stopper.


I then broke one of the lollipop sticks to create a sign, I then wrote using Micron pen "by the Sea" and added one of the small seashells.


In this corner I have added some hessian, threaded rust coloured twine through the octopus charm, added the sea shells and button. The blue beads I have adhered inside one of the shells and draped down to rest in another shell with tiny shells inside. I filled the small glass bottle with glitter.


To finish off I cut out the quote from one of the papers.

Linda's blogs 


Great piece Linda, love the shells upside down :)

If you would like to create something similar we still have a few boxes available on the website.

Hope you like Linda's work and can leave a nice comment. 

Jules xx 


Sunday 14 August 2016

August Box By the Sea Tag

Hello, Hope you are having a fab weekend.

 I have been raiding the contents of my Aug Goodie box "by the sea" to make this large tag. If you would like a box the are availble from my website www.artfuldays.co.uk


So I started with a large tag and added some Prima Modelling paste through a word stencil. 


Next I painted the whole tag with Prima white gesso and then started using a range of acrylic paints for the colour and kept blending 


Ok so I got total carried away with creating and forgot to take anymore photos, duh!!

Using some of the denim from the free pack I roughly cut a star and distressed the side with scissors, there's a meter of jute in the box so I pulled some strands out and made it more rustic before sticking on the bottom of the tag.

I took one of the card pieces and added some paint around the edges and some Glossy Accents over the sea and left to crack. TIP...heat drying doesn't seem to work, leave to dry naturally

Next I took one of the coffee stirrers from the free pack, broke and glued to make a little beach sign.
Then it was a case of adding the bronze star fish (I just love these), shells, button, some Prima Art Stones and adding a really light coat of white gesso to highlight and finished with some bling for the box.


I have to say I love the results, please join me over the next week or 2 for loads more inspiration on using your August Goodie Boxfrom our talented design team.

Till next time, happy crafting.

Jules xx