Search This Blog

Friday 31 August 2018

Mixed Media Houses by Teresa


Hello crafters

The weekend is upon us again woohoo. Teresa is back with her last post MDF for August and I have to say you do seem to be liking the designs :) 
I am just in awe of the crackle on these cute houses, its amazing and sets of the MDF pieces perfectly


Cover the houses with a generous layer of crackle paste and allow to dry naturally. 

Colour with Lindy's Magicals, Mica Spray and Metallic waxes, building up the colour until you are happy with the effect.


Paint the MDF with 2 coats of metallic paint and allow to dry.


Create a little ephemera bundle using cheesecloth, vintage dressmaking pattern and music pages. Clip together with a mini garment pin.


Assemble your piece by gluing the MDF shapes on first, then the ephemera, and finishing with the words on the top. 

Splatter a little sepia ink with a fine paintbrush.


Shopping List

Lindy's Magicals Cowabunga Copper and Bratwurst Brown

(from stash)
Paper Mache Houses
DecoArt Media Crackle Paste
Cosmic Shimmer Mica Spray - Gold
Metallic Waxes in Gold and Pewter
Tea Dyed Cheesecloth
Garment Pins
DecoArt Americana Metallics Paint in 24K Gold and Rose Gold
Sepia Ink

Please leave a lovely comment to support our designers and thanks for looking. 

For more projects for Teresa please check out her blog http://thefatcactus.co.uk and You Tube Channel https://www.youtube.com/channel/UChNbVhMz7jX66gevhKgz5Ig/feed 

Jules xx

Thursday 30 August 2018

Steampunk Altered Sewing hoop By Katie


Evening Crafters

Its Katie's turn tonight, we all love a bit of Steampunk and Katie has been very creative using a sewing hoop to make tonight's project.
Love the blue with the rust, it really works so well and with the addition of the contrasting coloured flowers the finished result is just beautiful.


Start by coating all the MDF pieces in white gesso and then paint the cogs with the red rust paste and leave to dry.
Take the Roman Clock and paint it with a light sage green acrylic paint and once that has dried apply crackle glaze over the top and leave to set
Take the Vintage MDF word and paint with texture sand paste and once that has set, paint over the top in turquoise. 


For the hoop paint the whole thing with burnt senna acrylic paint as the under coat and then paint on texture sand paste in random sections. Once dry paint these sections with turquoise. Next paint the rest of the sections with the dark brown rust paste and once this has dried go over the top with a light coat of the red rust paste.


Glue a large MDF wheel to the steampunk papers and cut to fit. and then glue the Roman Clock to the center followed by the word. Add paper flowers and small embellishments around the clock  face.


Layer the cogs together and add flowers to finish off the piece.


Shopping List 


If you would like to see more of Katie's projects, please check out her blog https://whatkatiedid2.blogspot.co.uk/

We would love you to support our designers and leave a lovely comment.


Thanks 

Jules xx

Wednesday 29 August 2018

Friends Forever Canvas by Teresa


Hello crafters
So I have had my first MDF release and asked the DT Team to make a few projects for inspiration for us all. 
It was so exciting to see what the team made with my designs. Frst up is Teresa with this really beautiful canvas. 


Use decoupage medium to apply vintage book pages to your canvas board


Once dry, use a paper towel or soft cloth to apply some tinted wax. This will give an aged appearance. Leave for a minute or two and buff off any excess with the cloth. Add further layers to deepen the colour if you want to.


Paint the MDF pieces with chalk paint and allow to dry.


Add some wax as before and buff off excess.


Arrange the MDF pieces on the canvas along with one of the Tim Holtz Found Relatives images, and glue using Cosmic Shimmer acrylic glue.


Add Crackle Accents to the MDF word and gold micro beads in several places. Finish with some Tim Holtz sentiment stickers and a mini kraft banner.


Shopping list 


(From stash)
5x7 canvas board
Tim Holtz Small Talk Snarky Stickers
Tim Holtz Clippings Stickers
Tim Holtz Found Relatives
Bare Basics Kraft Banner
DecoArt Chalky Finish Paint and Wax


Please leave a lovely comment to support our designers and thanks for looking. 

For more projects for Teresa please check out her blog http://thefatcactus.co.uk and You Tube Channel https://www.youtube.com/channel/UChNbVhMz7jX66gevhKgz5Ig/feed 

Jules xx

Saturday 11 August 2018

Mini Printer Tray challenge by Jules


Hello, so this week we have seen the fantastic makes from Katie and Teresa, using these plain old embellishment trays and tonight its my turn.......

I love the apothecary look, all the little bottles and aged theme really appeals to me, so I just had to create something based on this....

Don't forget both Katie's and Teresa blogs have FREE BLOG CANDY for leaving a comment, so please make sure that you pop over to their blogs as well.

You have until Midnight on Saturday 18th August to leave a lovely comment, and you are not restricted to only commenting on 1 blog so why not leave comments on all for 3 chances to win.

Blog links below.

Katie's Steampunk Tray 
Teresa's Travel Tray

Of course I also have some FREE BLOG CANDY  to give away as well, just keep reading until the end.......


I started with some Mixed Up Printable's Pharmacy labels & Poison Pharmacy  and the tray.


I knew I wanted to merge 2 of the slots together, so I carefully used a craft knife to cut away the little "shelf".

2 coats of Prima black gesso and it was ready to add the decorations.


An Apothecary shelf has to has some old books, so I used some old packaging, and pharmacy labels to create them.

I cut them to size and scored twice to make the spine of the book. Then used Distress inks and Lindy's sprays to add colour. Next I needed to distress the papers, I used my Prima distress tool, but you could use scissors (be careful) or sandpaper.

I just crumpled the labels and again added the Distress ink, before sticking down the book spine. I repeated the process on some advert labels to line the little shelves.

As usual when I am creating, I got lost in my own world and forgot to take more progress photos......


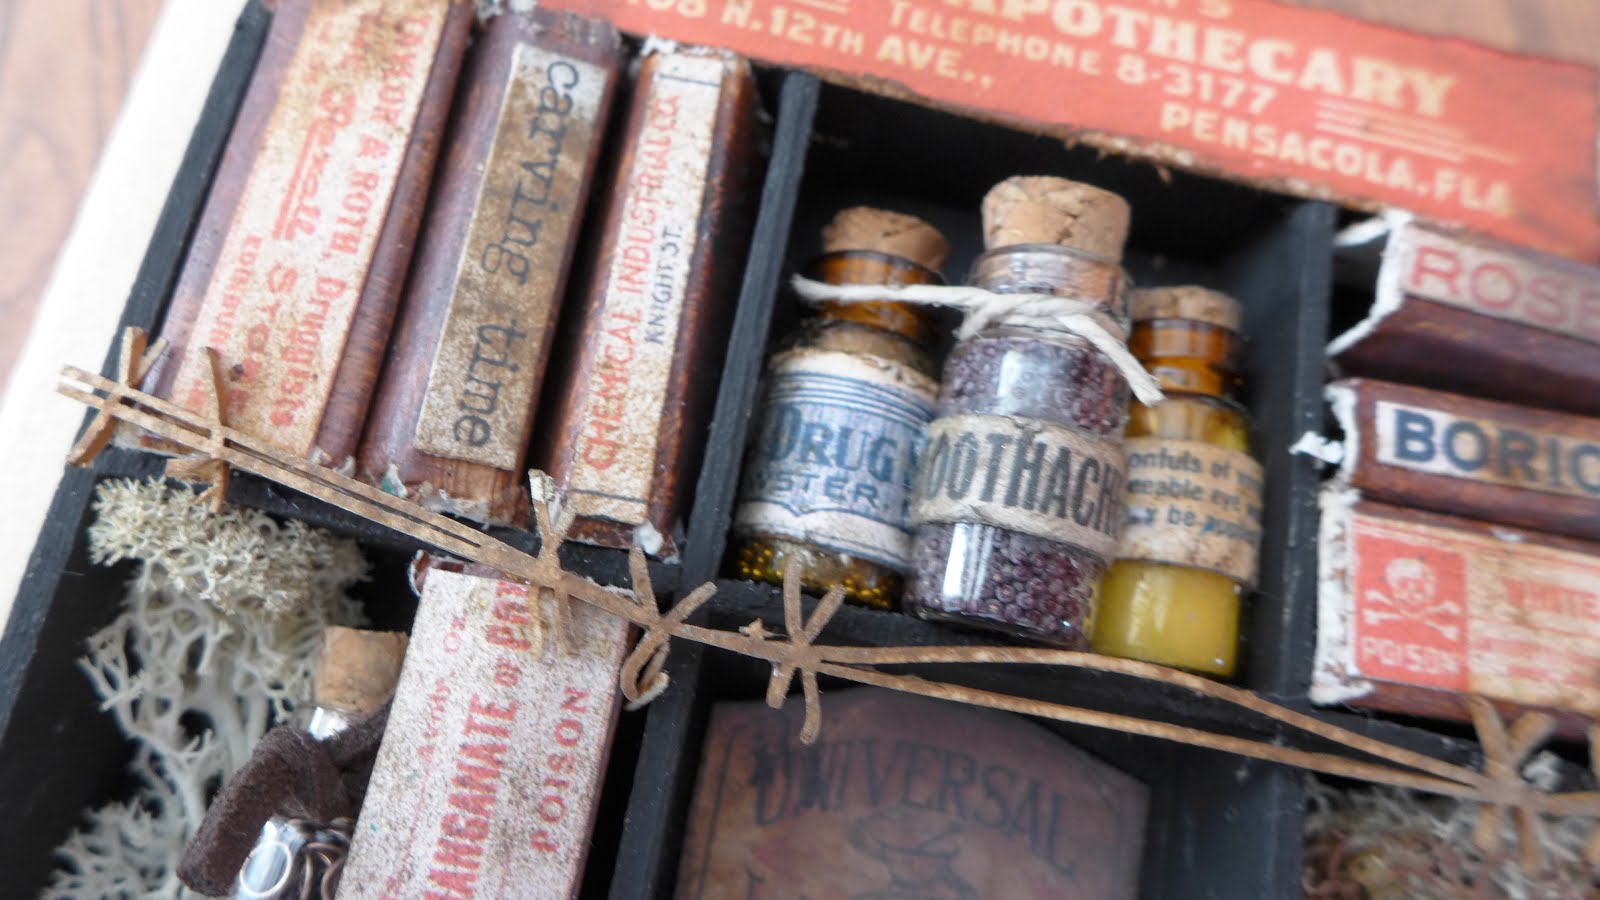
 .....but next I needed to fill my little bottles, I used a range of clear and tinted mini vials and filled them with micro beads, Deco Art Sprinkles, Art Sand and moss.

In a couple of the jars I added some Lindy colour sprays, so enhance the look.

Finish these with more distress labels and string.


White resin pieces are great to alter, so I painted one of the bottles I have with Prima black gesso and used gold wax to highlight, another distress label and twine completes it perfectly.

A further resin spiders web was added on a background on Finland moss and distressed with more Lindy's spray. I love the moss as it really adds bags of texture and something a little different.


I finished with a Scrapiniec "Stitches" chipboard piece and a little sign.  I also had a blank tray which fitted my little tray perfectly. 

This is my first mini printer tray and I am really pleased with it. 


So at the start of the blog I promised a blog candy giveaway, to give you the chance to create something similar and here it is...... Finland moss, 5 mini glass vials, bird cages, mini glass bulb and 3 resin bottles.


All you have to do is comment here on the blog and you will be entered into the draw. 

Good luck

Jules xxx


(The winner will be drawn at random, offer end midnight Saturday 18th August. If you comment after that you will not be included in the draw)


Sunday 5 August 2018

Treasures of the sea by Teresa Morgan


Evening all

Well I have to say Teresa surprised me with another sea themed project, she said that she "couldn't resist" making another project with all the goodies we have on the website. And WOW I am so glad she did as I love the shape and colour of this bottle, it works so well with the star fish and all the shells.

And with today's new release of Textured Trio's and the full range of Textured Rust Pastes from Finnabair, it couldn't be better timed, as these would also work really well on this style of project.

Don't forget to recycle all those old bottles, and try your local charity shops for interesting finds.
  
Chill out and relax with the "Treasures of the sea" altered bottle.


Use gel medium to glue some cheesecloth around the bottle. Add bulkier embellishments (starfish, shells, etc) with Pinflair Glue Gel. 

Mix some decorative sand with gel medium and apply with a small palette knife.


Once dry, cover with a coat of Chalky Finish paint in 'Vintage'. 


Leave to dry once again and then apply a small amount of Chalky Finish paint in 'Everlasting' using the dry brushing technique. This will highlight some of the texture.


Use your finger to apply  Metallic Lustre to the raised details on the bottle. 

I love the rich gold tones against the cool blue-green. Buff off any excess with a soft cloth to finish. 


Materials

(Artful Days Shop)

(from Teresa's own stash)
Empty Bottle
Cheesecloth
Gel Medium
Pinflair Glue Gel
DecoArt Chalky Finish Paint for Glass - Vintage, Everlasting
DecoArt Metallic Lustre - Gold Rush


Please leave a lovely comment to support our designers and thanks for looking. 

For more projects for Teresa please check out her blog http://thefatcactus.co.uk and You Tube Channel https://www.youtube.com/channel/UChNbVhMz7jX66gevhKgz5Ig/feed 

Jules xx