Search This Blog

Thursday 27 September 2018

Nautical Shrine by Katie Lamb


Hello Crafter's 

One more day to go to the weekend, woohoo! I am halfway through a project which I am looking forward to finishing. 
Tonight we have the wonderful Katie on the blog, fresh back from holiday she has a fabulous shrine to share, with a nautical theme and lots of rust - we love our rust here at AD :)I really like the contrasting blue here, and the embellishments at the top of each arch, balance the piece perfectly.

All the products used on this project are linked at the end of the blog.  


Over to Katie to share how its been created


Hello, I started off by assembling the MDF pieces, its best to do it at this stage because once you add paint the parts don't  always fit together. 

Once assembled paint with white gesso and use crackle paste over the large areas. 


Next add paint to the project and then apply a little rust paste.


Glue on some green net and fake moss. I recycled the net from some fruit packaging. (Great Tip Katie) and then glue down the embellishments. 


Paint the Scrapiniec pieces and then add a layer of crackle glaze. Once set dry brush with dark brown paint to bring out the cracks.

I painted the resin octopus with acrylic paint and then used the Prima Rust Pastes over the top. I repeated this on the shells too.

I decorated the shrine with mini shells, flatback gems and art balls.


Thanks Katie :)

If you have any questions about this or any project on the blog please do ask, we are more than happy to help.

If you would like to see more of Katie's projects, please check out her blog https://whatkatiedid2.blogspot.co.uk/

We would love you to support our designers and leave a lovely comment.


Thanks 

Jules xx


Products used from Artful Days Website

Scrapiniec Mermaid Mermaid-2505
Acrylic Shell Iridescent Cabochons  Acrylic-Shell-Iridescent-Cabochons-CA3024.
Faux Green Woodland Moss Faux-Green-Woodland-Moss

From Katie's Stash

Acrylic paints
Boat
Large shell 
Sam K MDF Fishnet


Tuesday 25 September 2018

Mixed Media Watch Box by Priya Mishra


 https://www.artfuldays.co.uk/


Evening Crafter's 

So tonight it's Priya's first ever blog with us and its a fabulous project. I can just imagine the changing colours in the light as you turn it back and forth, and if you are giving a gift to someone, get rid of the box and make something like this to make it extra special. 


All the products used on this project are linked at the end of the blog.  


Over to Priya to share how its been created. 

Hello Crafty Friends,

Priya here with you today with my first project for Artful Days. I'm so excited to be a part of this wonderfully talented team and I simply adore the products from the store.

Jules is such a wonderful artist and I was so surprised to know that she hand cast all the resin embellishments in the store. They are so unique and lovable.

I also especially loved the MDF elements and they add so much depth to your projects. And the cute stencils too…
For my very first project as a Design Team Member, I decided to make a Mixed media Watch box. 


I started by coating the box, all MDF embellishments and metal elements with a coat of black gesso.


Once they are all dried, I dry brushed with Finnabair metallic paints Midnight Sky and  Dark Velvet alternatively. 

When the color dried completely. I applied Old Silver wax with my fingers where I wanted to highlight.


Then I created some texture all over the box using Artful Days Stencil. Once dried, I gave a coat of black gesso on the box again. 


It was a bit tricky to capture this piece in my camera as the colors are changing with the mood of light. But I loved this chiaroscuro effect here...


Thanks for looking. Hope you like my project

Hugs

If you have any questions about this or any project on the blog please do ask, we are more than happy to help.

Please leave a lovely comment to support our designers and thanks for looking.

For more projects for Priya please click on the links below to follow & like her pages.


Thanks Jules xx


Products used from Artful Days Website


Supplies used from Priya's stash

MDF Watch Box
Little Birdie Heavy Gel Medium
Expressions Craft immix Texture Paste
Papericious Chipboard
Prima Art Alchemy Metallic Paint Midnight Sky
Prima Art Alchemy Metallic Paint Dark Velvet
Prima Art Alchemy Metallic Wax Old Silver


Thursday 20 September 2018

Steampunk Calendar By Reniferove


Hello Crafty People 

We will be having a blog or a Video post every Tuesday and Thursday from our talented Design Team, all our posts go out at 7pm, so do make sure you join us and follow our blog so you never miss a thing :)

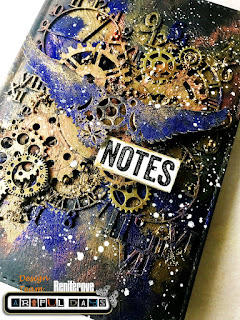
Tonight is Reniferove's first blog post with us and its absolutely stunning, it reminds me of a beautiful galaxy far away. The composition and colours are perfect, and what a fabulous gift this makes.... I want one :)
All the products used on this project are linked at the end of the blog.  

Over to Renifeove to share how its been created. 


Hello!
Today I have prepared for you a steampunk style calendar cover with a lot of gears and clocks.


First, the calendar was primed with black gesso, so that the surface would take paint better. Next, I glued the chipboard background with clocks with 3D Matte Gel and I also primed it with black gesso.

I put colours with Finnabair metallic paints, I chose paints in 'Rustic Brown', 'Steampunk Copper' and 'Midnight Sky'.

After creating the background, I composed a composition from gears and painted them with the same paints. I did the same with the Scrapiniec chipboard, but the main colour is 'Midnight Sky'.

At the end I added gold gears and Art Stones in two sizes, small and medium. I did not add many elements because the calendar should be useful and I did not want any element to brake (I wanted to add small light bulbs).

I highlighted the details with Prima Marketing wax in 'Rich Copper' and 'Vintage Gold' colours.
Calendar is a gift for my fiancé, he loves steampunk.


As you can see, sometimes you do not need many elements to create something beautiful and useful.


If you have any questions about this or any project on the blog please do ask, we are more than happy to help.

Please leave a lovely comment to support our designers and thanks for looking.

For more projects for Reniferove please click on the links below 

Thanks Jules xx


Products Used 


Reniferove own stash of paints 

Tuesday 18 September 2018

Bouquet of Barbed Wire by Teresa Morgan


Evening crafter's

Hope you enjoyed meeting our 2 new team members on Sundays blog, if you missed this the link is here https://artfuldaysj.blogspot.com/2018/09/our-new-dt-members-and-dragons-tale-by.html

Teresa is fresh back from holiday and has a gorgeous canvas to share with us tonight, and how cool is that title Bouquet of Barbed Wire. 

I am in love with the way the stencil has been used across the canvas panel and the soft dreamy colours with the beautiful flowers. All the products Teresa has used on this project are linked at the end of the blog.  

Over to Teresa to show you how its been made. 

Hello, so I started by applying  the modelling paste through the stencil using a palette knife and set aside to dry.


Blend the paints over the surface using a brush.

Once dry put the stencil back in place over the modelling paste to apply the Pink Chiffon paint to the roses, highlighting the design. 

Paint the MDF word and birdcage embellishment.


Mix a small amount of the decorative sand with gel medium and apply to the barbwire chipboards with a palette knife.
 
Once dry, apply Rose Gold Metallic Lustre and buff carefully with a soft cloth. 

Apply a little of the Metallic Lustre to the word and birdcage too.


Use gel medium to glue the barbwire frames in place. 

Cut the ephemera cards down to size and glue into the centre along with the photo booth image. 

Arrange the flowers between the frames and glue in place. Add Pearl Art Balls to fill any obvious gaps between the flowers. 

Finish with a little Metallic Lustre around the edges of the canvas for a subtle shine.


If you have any questions about this or any project on the blog please do ask, we are more than happy to help.

Please leave a lovely comment to support our designers and thanks for looking.

For more projects for Teresa please check out her blog http://thefatcactus.co.uk and You Tube Channel https://www.youtube.com/channel/UChNbVhMz7jX66gevhKgz5Ig/feed 

Thanks Jules xx


Products Used 
Small Wooden Birdcage 
Lemoncraft Ephemera Cards 
Paper Rose - Burgundy

Teresa own stash 
Canvas Board
DecoArt Americana Paints - Pink Chiffon, French Mauve, Blue Mist, Pebble
DecoArt Media Heavy Gel Medium
DecoArt Metallic Lustre Rose Gold
Tim Holtz Photo Booth image


Sunday 16 September 2018

Our New DT Members and A Dragons Tale By Jules Bell


Why hello, hello

Feels like ages since the last blog, been very lazy as just had 2 weeks off, back to the day job tomorrow....

So Its a 2 part blog tonight, first an introduction and a very big warm welcome to our 2 brand new Design Team members........ HELLO LADIES........and a little blog project from myself :)


~~~~~~~~~~

First it's Iwona Nowak-Marchewka AKA Reniferove


I fell in love with scrapbooking almost three years ago. I started with creating LO, occasional cards and albums.

For a year I have been dealing with mixed media and altering objects. Mixed media completely choked my heart and this is the technique I create most often. My favourite styles are steampunk, rustic and vintage. 

My works are characterised by layers, because thanks to this they are multidimensional, fluffy. All my works are made from the heart, for love of art and in each I put a part of myself.

And here is one of Reniferove's designs which I thought was incredibly stunning :)

See more from Reniferove 
Blog - http://reniferove-scrapy. blogspot.nl
You Tube -  https://www.youtube.com/ channel/ UCLVrIIRzOtaKhFjYj2UhSDA


And next we have Priya Mishra 

Hello, My name is Priya, a wife, a mother, a crafter and  a Human Resource Professional living in Thane, India. 
My journey into the craft world started with Paper Quilling and then about a year ago I came across this beautiful world of Mixed Media and fell in love with it. I have no particular style and I love to experiment with different products and techniques. 

I am a certified Craft Teacher of Pidilite Industries, India. This gives me the opportunity to take various workshops for the company where I teach school students, new crafters and hobbyists at different platforms. 

I take classes/ summer camps/workshops at schools, corporate offices and various places using their products.


This beautiful decorated bottle Priya made just blew me away:)

See more from Priya 

Blog - https://quillingbypriya.blogspot.com/
YouTube - https://www.youtube.com/channel/UCzQOYAVUABlNGux8Te_XA4Q/featured

They join myself, Teresa Morgan and Katie Lamb for the next 6 months. There's going to be more Video Tutorials as well, so excited to be working with all these super talented ladies, and I can't wait to show you what they are making:)

~~~~~~~~~
A Dragons Tale


So I was rummaging around the charity shop and found a bargain of 3 hard backed booked for just £1.00 and they looked like they have never even been opened and as I have just listed some new resins on the website I just had to use the dragon for my project. 

I gathered a few things I thought I might use on my book, including small small brackets, MDF Roman Clock, some Pearl Art Balls and scraps of paper. 


Using Soft Gloss gel and a rubber spatula I glued down several layers of papers, front and back. Its important not to just cover the book once, overlap a few times. 


Let this fully dry.


In the meantime prep the Dragon, hinges and clock face with Prima Black Gesso, its important to cover the resin with gesso so that other mediums with stick to it later.


Once the book is fully dry its time to distress it, I used a Prima distress tool and metal spatula to dig back some of the layers of paper.

Be rough on this part to achieve a good look, I could have done more at this stage lol:)

I also added the hinges using 3D matte gel


I wanted some colour and crackle in the centre, so used Paperartsy Chalk paints before applying the crackle glaze and then white paint over the top. 


This I then sprayed with a old tea dye spray and left this to soak in a dry on its own.


I started dabbing a dark brown paint before going onto the Prima rust pastes for more  texture and depth of colour.


Once that had dried I tore some more of the papers back to age things further.  


Using Lindy's sprays, I covered my dragon several times until I was happy with the colour. 


Once I had the parts in place,  I used the Prima mini art stones and my white Pearl Art balls along with more Lindy's to add the finishing texture. 


All that was left to do then was to highlight with Prima White Gold Wax and add my text.


I am so pleased with how this turned out and hope this post was useful to you too, if you have any questions please let me know. 

The products I have used are linked below. 

Thanks for looking 

Jules