Search This Blog

Sunday 16 December 2018

Romantic Winter Memories by Priya Mishra


Evening all,

So this has come round so fast, 3 months has passed since our design team started and this is the last blog post for 2018.
I would like to thanks everyone who has visited our blog over the year and those who have left comments, it means a lot to the designer.

We all wish you all a very Merry Christmas and a happy New Year, and hope you get some crafty time in over the holidays. 

Its Priya's turn with a lovely romantic winter canvas. Priya uses some stunning colours and today is no exception with this beautiful design. The team would also like to wish Priya and her husband a Happy Anniversary.

The products used are linked at the end of this post.
Hello Friends, 
Today I made a simple romantic mixed media canvas using a lot of Artful Days products.

This is my wedding anniversary month and I thought of making something simple and cute. 

After giving a coat of white gesso, I created some texture using Artful Days stencil and then layered it with some background chippies.
I attached a round mdf piece to create a moon kind of thing after I layered some chipboard frames on the upper part.

Then I attached some Artful Days lace.
I gave a coat of white gesso to everything after it dried.

Then I started colouring my piece with Lindy's magical shakers. Once I was happy with colouring, I attached a scrapiniec chipboard from AD store as my main element and attached some flowers from the store. Then I glued some AD texture stones and Deco stones. 

At last I dry brushed with white gesso. And my project is ready.
Hope you like it.


Thanks Priya

If you have any questions about this or any project on the blog please do ask, we are more than happy to help.

Please leave a lovely comment to support our designers and thanks for looking.

For more projects for Priya please click on the links below to follow & like her pages.

Blog

Thanks Jules xx


Thursday 13 December 2018

Yule Log by Katie Lamb


Hello Crafters

Hope your Christmas/Holiday plans are going well, only a few more shopping days until Christmas. It you are looking for a Crafty gift, then we are shipping up to the 20th Dec. 

Katie has been playing with a festive branch she made as a child and has updated it for Christmas. Its a great idea to re-purpose old projects you ave made before to give them a 2nd chance. 

I love the texture on this log, how well the faux moss works, and check out that crackle ...WOW...


Paint a log with black gesso and once dry and a layer of crackle paint. 

Once set,sprinkle on Cathedral Pines magicals.

Add a heavy gel medium on the top and use green glitter embossing powder


Add more heavy gel medium and add the fake moss on top.

Add more heavy gel medium and sprinkle on dec sprinkles, art sand and pearl art balls.

Add heavy gel medium to the top of the log and then sprinkle on white embossing powder.

Coat the resin reindeer with heavy gel medium and then sprinkle on embossing powder, heat carefully to melt powder.


Paint the threes with Green Texture Fantasy Paste.

Dry it off and then add white embossing powder to the treetops.

Glue pieces to log to finish


Thanks Katie :)

If you have any questions about this or any project on the blog please do ask, we are more than happy to help.

If you would like to see more of Katie's projects, please check out her blog https://whatkatiedid2.blogspot.co.uk/

Tuesday 11 December 2018

Gingerbread House by Reniferove


Hello Crafters

Welcome to the last week of blogs before Christmas, we will be taking an extended break to prepare and then get over Christmas lol. 

Reniferove is feeling very festive, with this beautiful biscuit/cookie box. I can smell Christmas just looking at it. What a fabulous gift this would make for family & friends. 


Do you also make cookies for Christmas? I bake every year and make a small portion for gifts for my relatives. This year I decided to make a box for gingerbread cookies, I invite you!
I started the work with the application of white gesso, and then with the help of 4 shades of brown paint I created a background in light gingerbread color. To give even more festive atmosphere, I used a stamp with notes.

The composition I created from lemoncraft papers, lace, cinnamon and lemon slices. A mdf word, a bit of snow and a box for cookies with the aroma of cinnamon ready.


Thanks Reniferove 

If you have any questions about this or any project on the blog please do ask, we are more than happy to help.

Please leave a lovely comment to support our designers and thanks for looking.

For more projects for Reniferove please click on the links below 

Thursday 6 December 2018

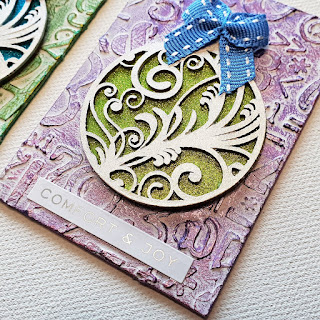
Glittered Bauble ATC's by Teresa Morgan


Good evening crafters

You made have noticed there was no blog Tuesday, however Katie shared a little art doll she made with our stamps on her blog and you can view the post here

How's your Christmas crafting coming along? Do you need a quick but very effective and beautiful project??
Look no further as Teresa brings us three colourful ATC's, and I am thinking these would also made fabulous card toppers to send to your family and friends. 
We have the baubles in stock and you can view them here

This is Teresa's last blog post for the year, and I am sure you will agree that she has made so many beautiful projects over the year. 

Big thanks to Teresa :) 


Apply the modelling paste through the number stencil and allow to dry.


Apply several coats of glitter paint to the bauble bases, building up the colour. (Top tip, if you don't have glitter paint, you could paint and then sprinkle glitter whilst the paint is still wet)

Paint the filigree fronts with a couple of coats of pearl paint.


Once the modelling paste is dry, paint the ATCs with white gesso and let this dry. 

Use your finger to apply metallic lustre waxes to each, highlighting the texture from the stencil.


Glue the filigree layer onto the bauble base, then glue this onto the ATC. 

Finish with a ribbon bow and metallic sentiment sticker.


Thanks Teresa 

If you have any questions about this or any project on the blog please do ask, we are more than happy to help.

Please leave a lovely comment to support our designers and thanks for looking.

For more projects for Teresa please check out her blog http://thefatcactus.co.uk and You Tube Channel https://www.youtube.com/channel/UChNbVhMz7jX66gevhKgz5Ig/feed 

Thanks Jules xx

Products used from Artful Days


(from Stash)
greyboard ATC blanks
Pebeo white gesso
DecoArt Glamour Dust glitter paint
DecoArt Extreme Sheen Metallic paint
DecoArt Metallic Lustre waxes
small ribbon bows
Tim Holtz metallic stickers