Search This Blog

Tuesday, 12 February 2019

Opulent Artist Trading Coin Card Toppers by Teresa Morgan


Good evening Crafters

So we are taking coins tonight, not the ones we use to spend on crafty goodies lol, but Artist Trading coins. This phenomena started last year and has kept increasing in popularly ever since. The perfect size is 6cm, we supply them in MDF and Chipboard. 


Tonight Teresa is going 1 step further and turning them into cards, and as you will see, they also make beautiful toppers.

All the products used are listed at the end of the blog. 


Start with the Scrapiniec Chipboard ATCOINS, Snip sections of the Mehendi Boarders and glue to the Artist Trading Coin bases.


Add colour, shimmer and sparkle with Lindy's Magicals, Glitter Ink and Alcohol Ink.

 The chipboard absorbs the colour really well for a rich deep tone.


Highlight the intricate detail of the Mehendi Boarders using Metallic Lustre applied with your finger. The Prima wax is also perfect for this.


Apply Distress Oxide inks to white cardstock through the stencil using a foam applicator tool, blending the colours together. 

Mat onto gold card, then attach to card front.


Add mini flowers, metal charms and micro beads to the coins using gel medium to adhere. Finish with a sticker and add to card front.


Thanks Teresa 

If you have any questions about this or any project on the blog please do ask, we are more than happy to help.

Please leave a lovely comment to support our designers and thanks for looking.

For more projects for Teresa please check out her blog http://thefatcactus.co.uk and You Tube Channel https://www.youtube.com/channel/UChNbVhMz7jX66gevhKgz5Ig/feed 

Thanks Jules xx

Products used from Artful Days


(from stash)
DecoArt Metallic Lustre: Majestic Purple, Gold Rush
DecoArt Media Heavy Gel Medium
Brea Reese Glitter Ink: Lake Blue
Ranger Alcohol Ink: Sailboat Blue

Tim Holtz Idea-ology: Chit Chat Stickers
Ranger Distress Oxide Inks: Chipped Sapphire, Peacock Feathers
Card blanks
white and gold card

Thursday, 7 February 2019

Sweet Home - Altered Tea bag Dispenser by Priya Mishra


Good evening peeps

Tonight we welcome Priya back to the blog for 2019 and wow she has really pretty project made from recycling packaging, proving once again to save everything you can as you never know when it will come in handy. Although maybe if you can't see the floor anymore its time to part with some things hahaha. 

We are having a pink pink week here at Artful Days to inspire you for Valentines makes, or if you simply love pink. 

As already links to the products used are at the end of the blog. 


Hello Crafty Friends,

Today I have a beautiful Altered Art to share with you.
February is Valentines month and I thought of creating something really cute and romantic.

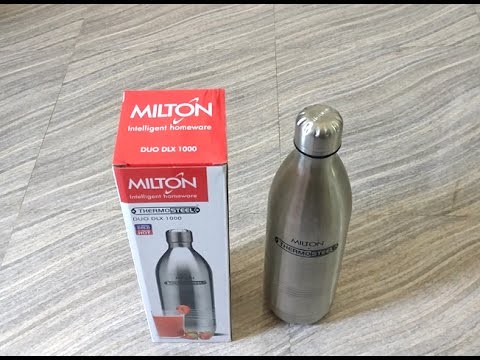
I had this flask packaging with me, I actually never through to use any such box in my Mixed Media projects.

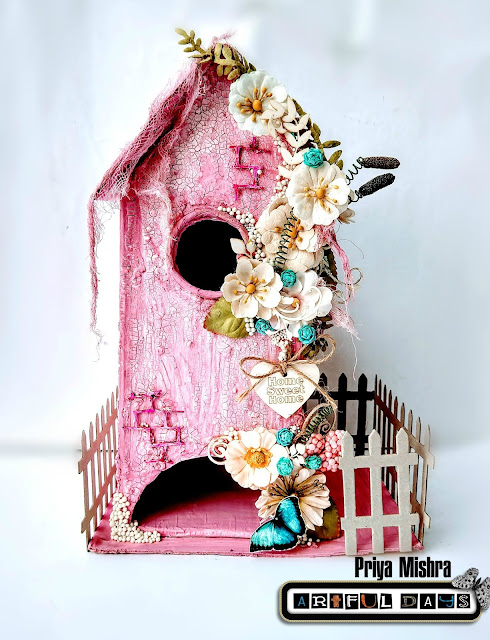
This is a tall box and I altered it into a beautiful Tea bag dispenser...

Image result for milton flask with packaging

First I cut the box in the shape of a house and created the space for Tea bag dispense. Then I attached it to another hard cardboard base and attached the roof. 

Then I layered the whole piece with Prima heavy white gesso and once that dried I added a coat of Crackle texture paste.

Then I attached some cheese cloth on the roof and sides of the project and also attached small chipboard cutouts here and there. 

At the window I attached a paper roll to give some depth.After everything is dried, I coloured it.

Then I adhered some paper flowers, some butterflies and twines to decorate it. 

I also attached some laser cut chipboard and a chipboard piece which says "Sweet Home" on to it. Adhered some stones here and there and finally attached the fence around the house to complete the look. I did not colour that piece of chipboard and I like the way it is complementing the whole project.

Here are a few more pics of the project.

Hope you like my project.
Thanks for visiting,
Hugs,


Thanks Priya

If you have any questions about this or any project on the blog please do ask, we are more than happy to help.

Please leave a lovely comment to support our designers and thanks for looking.

For more projects for Priya please click on the links below to follow & like her pages.

Blog

Thanks Jules xx


Tuesday, 5 February 2019

Valentines Day Shadow Box by Katie Lamb


Hello wonderful people

Colours, what your favourite or the one you never use or even fear to use. 
Why join our group on Facebook and take part in this months colour challenge? Click here to join in  :)


So its Feb the month of love & romance... and Katie has crafted up a dream using a wonderful bright colour which truly stands out......don't forgot to say from guess who?
I love the hearts, they look like little balloons and the heart filled with glitter is so cute. This would make a great gift to your special someone. 

Roses are red,
Violets are blue
Writing a craft wish list in ink
Whilst thinking of using pink

All the products used are at the bottom of the blog 


Paint shadow box white and allow to dry.

Next mix pva glue in with a bit of water and cover edges of box

Rip up tissue paper and decoupage shadow box. 

Dry brush on pink acrylic paint and once dry pain the inside.


Glue sisal to one of the compartments and add the golden hearts.

Start gluing large metal charms and wooden embellishments to the inside of the box.

Decorate bottom with glass shards, sand and art balls.


 To create the large heart decoration, glue flat back gems and small charms inside the hollow heart. 

Fill in with gloss enamel and leave to dry for 24 hrs.


Decorate with flat back cabochons and mini flowers to finish.


Thanks Katie :)

If you have any questions about this or any project on the blog please do ask, we are more than happy to help.

If you would like to see more of Katie's projects, please check out her blog https://whatkatiedid2.blogspot.co.uk/

We would love you to support our designers and leave a lovely comment.


Thanks 

Jules xx


Artful Days Shopping list


Friday, 1 February 2019

Violet By Reniferove


Hello Crafters 

Do you love making scrapbooking layouts?? Reniferove has a great page with lots of layers and colour. The composition is works so well and there's so many elements packed into this one page. Of course this could be made on any type of surface, its not restricted to just 12 x 12 papers. 

All the products used are linked at the end of the blog.


I decided that this year more often I will leave my comfort zone and reach for other colours, in the end how many works can be done in turquoise and violet (by the way, a lot). 

For a long time I wanted to create something in crazy, vibrant colours and. I chose the fuchsia and violet colour (oops) and combined it with the blue. I also went crazy with the composition!

There are many different elements that create layers and layers and even more layers. You will find here resin castings, flowers, pieces of paper and material, metal elements and lots of vivid colours. 

I encourage you to leave the comfort zone, because the effects may surprise you!


Thanks Reniferove 

If you have any questions about this or any project on the blog please do ask, we are more than happy to help.

Please leave a lovely comment to support our designers and thanks for looking.

For more projects for Reniferove please click on the links below 

Thanks Jules xx


Artful Days products used


Tuesday, 29 January 2019

Fairytale Unicorn Tag by Teresa Morgan


Hello Crafter's


So who's following the new challenges in our little Facebook group?? This month its a tough one challenge, create a small project in 20 min using at least 5 different products and 1 lucky winner will win £10 to spend on goodies from the website. All the details click here

So on to tonight's blog, when Teresa send me her project my first word were WOW, wow and wow. I love this, and our first sneak peak of our brand new flowers collections which will be available on the website in the next few days.....

The colours are amazing, so rich and I just love how Teresa has set out all the little embellishments, plus there's a new stencil which will be available very soon. 


All the products Teresa has used are listed below. 

So hows it made I hear you cry..... Over to Teresa to explain 


    Take the chipboard tag and apply modelling paste through the stencil using a palette knife, Allow to dry.


    Blend the magenta and purple acrylic paints over the surface and dry. 

    Stamp the net wire design randomly with clear embossing ink then heat emboss with Rose Gold embossing powder. 

    Add some gilding wax to the edges of the chipboard tag.


    Add extra texture and interest to the brand new paper flowers collection and gold hearts using metallic micro beads. 

    Apply a small amount of gel medium, sprinkle on the beads and allow to dry before shaking off any excess.


    Paint the MDF coin with turquoise acrylic paint and once dry, edge with gilding wax.

    Paint the unicorn with Violet Interference paint (this casts a opalescent sheen when the light catches it - hard to capture on the 
    photo). 

    Apply gilding wax to the unicorn's horn.


    Colour the lace flowers using alcohol inks and allow to dry.


    Snip out some of the brick design chipboard and paint black. 

    Once dry, apply gilding wax all over


    Heat emboss the chipboard word using two coats of Rose Gold embossing powder.


    Assemble the finished piece using heavy gel medium to adhere the embellishments. 

    Begin with the chipboard brickwork, then add some flat metal embellishments. 

    Arrange the hearts and flowers on top and finish with some pearl beads and sparkle gems.


    Thanks Teresa 

    If you have any questions about this or any project on the blog please do ask, we are more than happy to help.

    Please leave a lovely comment to support our designers and thanks for looking.

    For more projects for Teresa please check out her blog http://thefatcactus.co.uk and You Tube Channel https://www.youtube.com/channel/UChNbVhMz7jX66gevhKgz5Ig/feed 

    Thanks Jules xx

    Products used from Artful Days

    Stencil - geometric flower (coming soon)
    Box of Blue Paper Flowers (coming soon)
    Bronze Circle Frame with Tree Glass Cabochon (I used a pink one, linked to  blue one in shop)

    (from Stash)
    DecoArt Media Fluid Acrylics: Dioxazine Purple, Quinacridone Magenta, Cobalt Turquoise Hue, Interference Violet
    DecoArt Crafter's Acrylic - Black
    Pebeo Gesso - White
    Pebeo Gilding Wax - Empire Gold
    WOW Powders Embossing Powder - Rose Gold
    DecoArt Media Heavy Gel Medium
    Ranger Alcohol Inks - Raspberry, Purple Twilight