Search This Blog

Tuesday, 23 February 2016

12 Tags - February

Hello

I have decided to try and do a few more challenges this year and have long wanted to do the Tim Holtz 12 tags for a while now and having been inspired my the man himself at a trade show what better time to start...

Link to the blog here

I loved the embossing texture paste, cool idea, really enjoyed this little project. 


Thanks for looking 

Jules xx


Sunday, 14 February 2016

Encaustic Wax Art Panel

Hello

I have combined my New Everything art/PaperArtsy stamps with the new topic, Wax on the PA blog. see here.

I have seen wax art before but not really paid much attention, but I absolutely loved looking at all the art on display and have spent quite a few hours on You Tube and Pinterest to try and find out more.

There's quite a few materials required but I didn't want to spend any money if if wasn't something I liked, so I had to improvise a lot....

First issue a heat source, I don't have a melt pot so I remembered we had a Chinese food burner and some foil tins which worked very well.
Next no wax so I brought I cheap candle and kids crayons from the supermarket and melted over the burner.

So first the first try was a disaster, I tried making black lines and ended up with a huge mess which I scraped off and tried again after watching some more video's

I am guessing that with the proper materials things would hopefully be easier.

You really do need the white background if your not adding colours. I did 2 layers on wax and fused, this time I held my heat gun further away from the wooden surface, just to get the gloss look and not remelt.
Then layers on tissue stamped script, then main image this time I stamped on white paper instead of tissue paper and coloured with Gelatoes. I brushed on the back with wax first before I quickly laid down on the surface, this was much better, next I added the black die cut circles in the same way.

This is the only process photo I took as got carried away.


I wanted the phrase to stand out so used some white crayon wax first, but when I did another layer this melted and moved, see below, not sure if this is because its a kids crayon or if your not supposed to do another layer over the top or something else, very annoying through.


I added a couple of strips of gold card and a button and give one last coat before I dipped white wax over the top and added gold micro power and flake.

Mmmm ok I think, really want to do a workshop on this to learn further about layering then fusing colours and how to get a textured surface instead of a flat one. If anyone can recommend one, maybe online I would be grateful and then I can buy the proper kit to have a better go. Really like the idea of making art this way and think there's a hell of a lot of learning to be done.

Thanks for having a look and hope you can leave a nice comment.

Jules x


Sunday, 7 February 2016

She's all Heart

Hello

This is my first blog of 2016, since Christmas I don't seem to have had much time and haven't really felt very creative. However this weekend I have managed to get 3 blog pages done and this is one of them.

The Challenge over on the Paperartsy blog is Hearts, see here

This is in my small Dylusions journal.

I drew the girl and coloured with some fresco and Amsterdam paints. The used a Darcy stamp for the hair, Clare Lloyd's stamps for the hearts and sentiment and Emma s stencil. 


Hope you like her and can leave a nice comment 

Jules xx

Sunday, 6 December 2015

Masterboard Christmas

Hello

I have to do some Christmas cards with the masterboard. I love traditional colours so have gone with a red and green theme but in a modern way.

This is the finished card, it was dark when I took this photo for a chance!!!


I managed to get 4 cards from this A4 piece.


This last one is my favourite 


 Thanks for looking 

Jules xx

Sunday, 29 November 2015

Master Boards cards

Hello

Here's another Master board card which I made into a New Home card for a Friend 

I made the back ground and then added the extra stamping and a house etc. 


And here is the Christmas Masteboard card I did last year, love these think I may do them again. 


Jules xx

Masterboards

Hello

Over on the PA blog the last topic of the year is masterboards. See here!!

Love this one because is so easy and really effective plus you can turn the board into anything you want to. 

I started with the below colours and used a small brayer across an A4 sheet of what card


Using 3 different stencils with Archival inks this was the next pic


then I just carried on building the background with various stamps to get my finished sheet


I already knew I was going to use it to cover a matchbox for a share, its great to see the details after you cut it up, just need to go and finish this now....


I have loads left for another project I want to do as well.

Thanks for looks

Jules xx


Sunday, 25 October 2015

Filled with Wisdom

I wanted to create a face with age but no wrinkles lol

After seeing Leandra at Donny last week and getting the Dreamweaver crackle paste I had to try it out of this face. 

Using lots of layers and I mean lots of Frescos I painted the face and added a thin layer of crackle.

I choice the colour scheme so I could use my rusting powders, which even though I have had it for a few months this was the first outing.

Finished with my new Sara Naumann stamps 

I am quite happy with how this turned out, will be using the crackle paste on my faces again. 


Jules xx

ANGEL

The fortnightly challenge on the PA blog has been faces.

This was a simple sketch will I wanted to work with, lots of frescos paints and stamping in the background and on the dress.

Treasure gold die cut and embossed wings.


Jules xx

Sunday, 11 October 2015

Wearable Art - Brooch

Hello

This is my last project, I had 2 others I wanted to do for the PA challenge but ran out of time :(

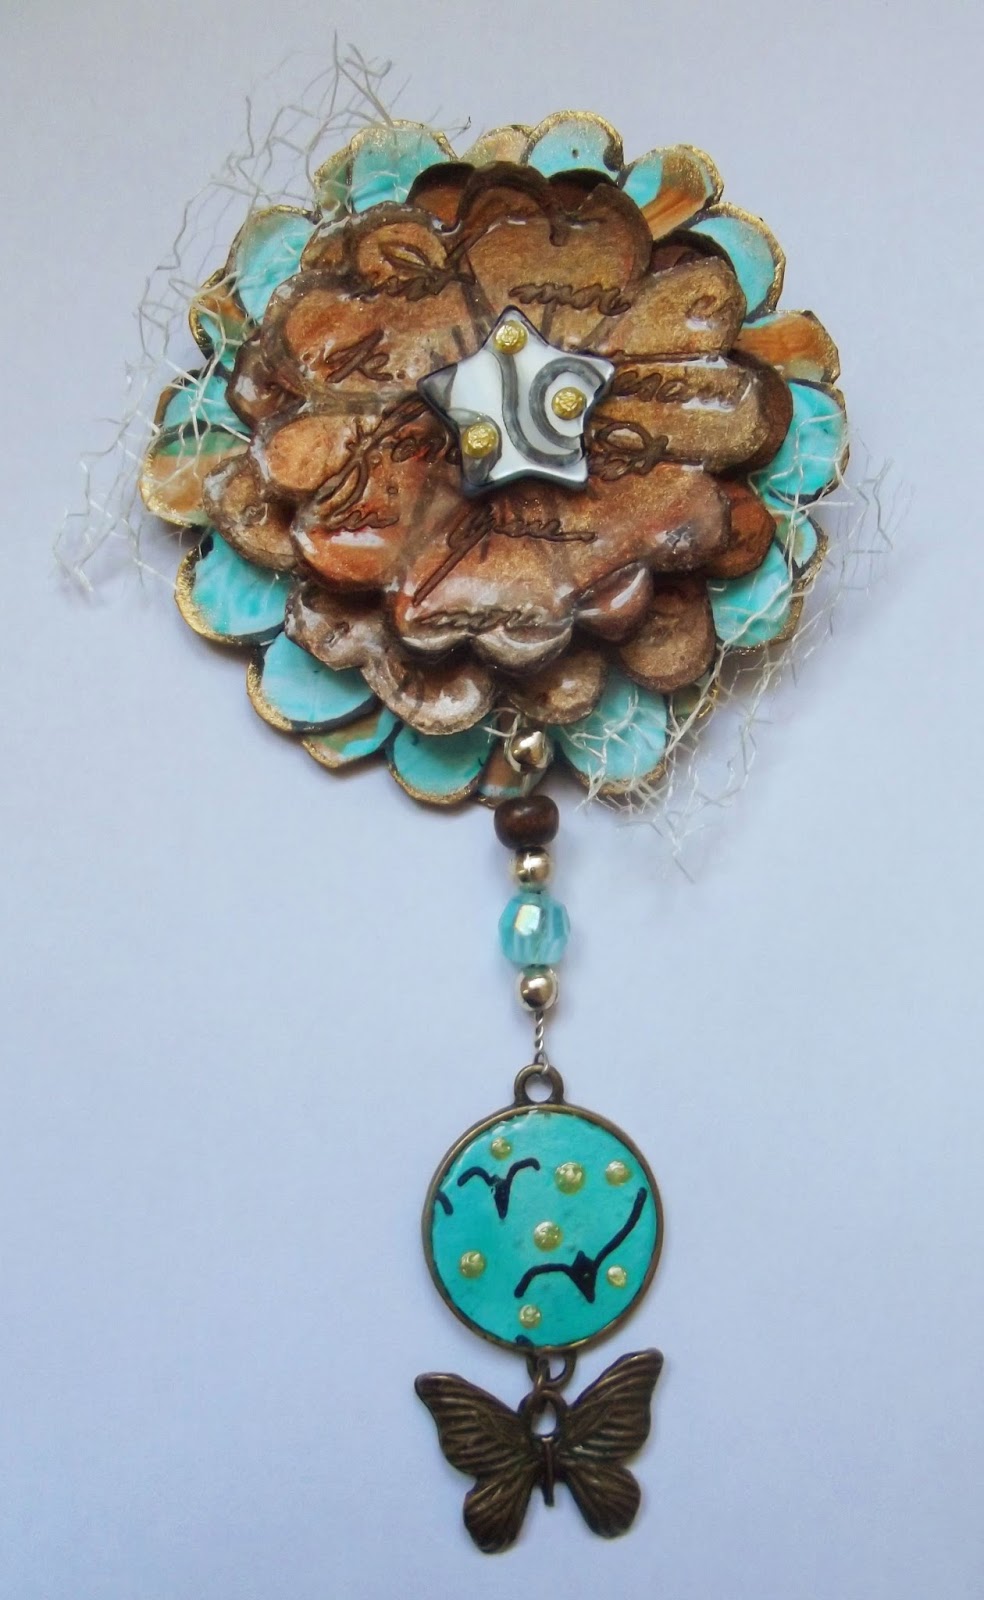
So for the brooch I started with a die cut grey board circle and stamped Darcy's heart flower, cut out the hearts, painted them with frescos and stuck to the circle which I painted both sides in black. 


Next I used TG to cover and piece of card and again stamped the heart flowers using Stazon ink. I built up layers of clear embossing powder and stamped a script stamp and rubbed in black paint and cleaned off.


I used Golden gel to stick them together.

I had a cute little Prima charm which I wanted to hang from the flower. I used Darcy's little bird stamps and painted the background. Punched out a small circle which I later filled with pearl drops and glossy accents 


Before that though I threaded some beads onto wire and stuck under the main flower. 

Next I found a plastic star and stamped again with Stazon ink, covered in shimmer glaze and added a few pearl drops for the centre of the flower.

On the back I added the pin and covered in card and painted the whole back black.


I am really pleased with the finished piece. 


Thanks 

Jules


Wearable Art - baseball cap

Hello 

I brought this plain white baseball cap on hols as they only had this one in the shop, but thought at some stage I could add some colour, it was perfect for the PA challenge 


I stamped the Flamingo stamp onto tissue paper as it would never stamp straight on, problem with this which I didn't discover until later is the matte medium dilutes the colour - live and learn!!!


I coloured in used frescos and then started on the brim.


The sewn lines helped with placing the colour, and I added some stamps and some pearl drops 

I finished with some ribbon.


 I can't say I am overly happy with the results, but I did learn about painting on to fabrics.

Thanks 

Jules 


Wearable art - Ring

Hello

Whilst having a route through my broken jewellery I found and broken chunky ring so decided to give it a new top.

I stamped a small Darcy circle into paper clay and carefully cut out.


I left the to try out and found a button the right size to glue onto the ring, before I did this, I stamped using stanzon ink and then covered in shimmer glaze.

When the clay was dry I painted pink and used silver TG to highlight, then I took a black pen an traced some on the detail.

I finished with glossy accents and glued together.

Cute!!

Thanks for looking


Sunday, 4 October 2015

Wearable Art ~ Clay Necklace

Hello 

Wearable Art, is something that has always fascinated me and there's some amazing people out there making it.

On the Paperartsy Blog the fortnightly challenge is Wearable Art, see here 

I have never really made any jewellery but inspired by the topic I thought I would give a necklace ago.

I found some jump rings, an old necklace and some cute charms to start with. 

I used paper clay for the main pendent and tried a few PA stamps in it but this one from Claire's range seemed to work best as it gave the best definition in the clay and I love faces!!

So how do you get things to hang??? I went with some eyelet pins and pushed them into the clay whilst wet and let it dry for about 14 hours. I found they still came out to ended up gluing them in. 

The I made some paper beads, another first, I did this from old book print and give them a shimmer glaze, I threaded them and some beads onto craft wire with a charm.

Next I painted the girl with Frescos and a very five brush. When that was dry I used glossy accents to seal and give some shine and when that was dry assembled the whole things.

Phew!!!

Hard work for me as I wear long nails and this stuff is fiddly. 

I am quite pleased for a first go. 


Hoping to have time to do a second piece for the challenge as there's something I really want to do. 

Jules xx